Showing posts with label Tutorial. Show all posts

Friday, May 18, 2012

Quick Pant Patches

So I was recently talking with another mom and she mentioned that she doesn’t sew but does repair lots of clothes as she has 4 girls (so you know there is a lot of hand-me-downs).  She was telling me that she uses those iron on patches and would just put one on each side of the clothing and iron them together…works but they are very stiff and her girls don’t really like it.

I told her that I just use a product called Speed Sew for those kind of patches, much easier than trying to use a sewing machine and it only takes a minute.  She had never heard of it before, so I wondered if there were other people out there that haven’t heard of these kinds of quick and easy products…so I figured I would share.

So here are a pair of O’s jeans (they are a size 1T so impossible to sew on a machine) and they are in good shape other than the hole in the knee. 

DSC03955    DSC03956

All you need to repair these is the holey clothing, fabric for the patch and a tube of Speed Sew.

DSC03957    Cut the fabric big enough to cover the whole.  I also trim the loose threads around the hole to make it look cleaner.

DSC03958

    Coat the edges of the fabric with the Quick Sew, I just put some on my finger and spread it around.

DSC03959Then flip over and press onto the jeans.  Let dry and you are good to go.    DSC03960

I’ve washed these a couple of times and the patch is showing no signs of falling off or anything.  Super quick and easy! 

Did anyone spot the one mistake I did make while repairing these jeans?!?  Yah, I totally put the fabric patch on backwards…doesn’t make a difference on this repair as it is so small you can barely even see the patch but on bigger ones it would look funny.  So make sure to put the Speed Sew on the RIGHT side of the fabric, the side you want to show through!  (-;

Friday, January 20, 2012

Sewing a Themed Tie


407739_272465079484096_142313155832623_770440_519000290_n

My cute nephew modeling the new tie – he will be a sharped dressed boy at that Mickey’s breakfast.

I realized that I was lacking a few key pictures and tried to get some of another tie I have (as I already gave my nephew the tie).  Some pictures are still missing but comment below any questions you might have and I will try to clarify or add pictures if I need too.

Materials -

1/2 yard of fabric (I used the red and scraps of the polka dot for a contrasting collar)

Coordinating thread (I needed black and red)

Heat’n’Bond Paper

Scrap Fabric to make themed picture

Velcro

  1. I took a tie of my husbands and measured it on my son for length.  Then I traced it on paper for the length of tie I wanted (Sorry, no pictures - I did this the first time I made a tie, so awhile ago). 
  2. Cut out the themed picture that you want and cute a piece of Heat’n’Bond paper the size of the shape.  I made a Mickey head on paper and then traced that onto some scrap black minky I had and cut out the shape.
  3. Put the themed shaped on your pattern paper that you traced the tie.  Now you will use this to figure out how wide you need to make the tie.  (This tie is wider than normal to fit the Mickey head, but I figured it would fit into the cartoon theme.)
  4. Once the finished tie shape is done I added dashed lines around 1/2 inch away for cutting out the pattern, that is my seam allowance and then cut out the pattern. 
  5. Using pattern, cut out 2 tie shapes.  (If your fabric has a pattern or design then take care to make sure the pattern is the correct direction for the front and back of the tie.)
  6. Also cut 2 rectangles from the fabric (or contrasting fabric) approximately 15”x2”.  (Also watch the direction of the pattern.)DSC03881
  7. Sew the collar pieces together by placing the right sides together and sewing around (using 1/2” seam allowance) and turn right sides out.  Be sure to leave an end open for turning out…and then just keep working at it until you get it through.  =)
  8. Iron the seams flat and top stitch the opening.  You could also top stitch around the collar piece if you want.  I did for the Mickey tie but I don’t always do it (as you will see from the different tie pictures below)…but it would help it stay flat if you wash the tie.
  9. Place velcro on the ends.  (Make sure that you place the pieces on opposite sides of the collar so that it will do up around your neck.)  Now the collar is done.DSC03903 DSC03905                DSC03904
  10. Follow the instructions on the Heat’n’Bond (or similar product).  Basically you place one side of the paper onto your cut out shape (the bumpy side) and place the iron on it until they stick together.       DSC03884
  11. Next you trim the paper so it is the same as the fabric shape and position the shape onto one of the tie sides where you want it (make sure it is on the right side of the fabric – the side that is on the front facing out), removing the paper and hold the iron on it until the shape bonds onto the tie.      DSC03889
  12. Top stitch around the shape so that it stays in place and can be washed.DSC03888
  13. Now place the 2 tie pieces right sides together and stitch together using the 1/2” seam allowance.  Make sure to leave a 2” - 3” opening to turn it right side out.  Also trim the corners before turning right side out so that it lays flatter.
  14. Turn right side out and top stitch the opening closed.  Now the tie portion is complete.

Now you are done the sewing and just need to tie the tie to the collar and you are finished.

DSC03891

I also realize that tying the tie could by fun, I’ve done a few so I figured out how it needs to be done.  Below are some pictures of the knot so that you can try to figure it out, they are of the front of the knot and the back of the knot.

DSC03906   DSC03902

Some basic instructions are to hang the tie over the collar and then wrap the back of the tie around the front and then tuck it in the back to form a half knot.  Then just adjust it so that the collar isn’t too squished and the knot and length of tie look the way you want.  After you have done it once it is easy to do again.  =)


So that is the tie tutorial…how did I do?  Can you understand it?  Does anything need clarification?  Comment below if you have any questions.

I also sell ties if you don’t sew or just don’t feel like making one, you can comment on my Facebook page (or below) or email me.  I can make them with basically any fabric and with most shapes just let me know what you want.  (Prices will vary depending on theme.)

Tuesday, November 1, 2011

Mail Merge Tutorial

I am sure that there is a lot of you out there that have done this with an office job (that is where I learned how to do this) and I started to use mail merging to get my labels for all my Christmas cards (and some other occasions that I have had mass mailings for).  It is very handy for Christmas since I have a spreadsheet that I use every year, I make a new page for each year and copy over all the addresses that I am using again.  Then I can change any addresses that have changed during the year and add any new addresses of people I have met that I am also sending a card to.

So here is how you do it!

You will need -

Your addresses

Peel & Stick labels (Avery or other brand)

1.     Put your addresses in a spreadsheet or use the one I provided here.  (This can take a while the first time but think of how easy it will be next year!)  Make sure to have separate columns for the name and addresses like my spreadsheet has.

2.     Open up a blank Word document and go to your mailing option and choose “Start Mail Merge” and pick labels from the options.  (There are so many version out there of Word that I cannot direct you how to exactly find the mailing options.)   In the labels option you can pick out a template, it usually has all the Avery options (which are the most popular) but has a ton of other ones as well.  Check the packaging to see what the template # is.  Select “OK” and it should open a page that shows your label lines.

image

3.     Now you can go to the Mailing Options (if they aren’t at the top of your screen like they are on mine).  You are going to pick “Select Recipients” and choose from an existing list.  This will allow you to find the address spreadsheet that you created, once you choose that it will ask you to choose which page, make sure you pick the year you want (important for later years).

image

I picked the 2011$ sheet.

4.     Now you are going to take a quick look at the list, “Edit Recipient List” and make sure that there aren’t any blank lines selected (it is best to make sure you don’t have any extra spaces in your spreadsheet.  Also double check that the columns are in the right order, mine had the Town & Province one after the Postal Code, I just clicked on the one and dragged it to the proper location.

image

Hit “OK” when you are done going through it…it should have <<next record>>  in the labels.

image

5.     Now you are going to insert the merge fields that you want, so click “Insert Merge Field” and you should get a list that has the same titles as your spreadsheet.  Make sure you click to insert all the required headings, then you can close that window and move the headings around how you want them.

Before - image
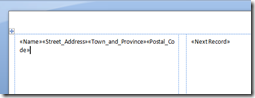
After - image

6.     Now you want to copy and paste the Address headings into all the label cells MAKE SURE YOU KEEP THE <<NEXT RECORD>> AT THE START OF EACH LABEL!!  (That is very important or you will end up with a full sheet of one address and you will have to manually ask it to put in each address…)
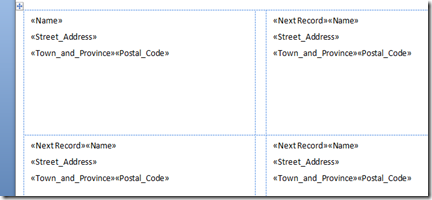
image

7.     Now you can “Preview Results” and it will put the addresses in for you.  Use this to check that you are happy with the spacing and things…make any adjustments that you want while you only have to do it to these few label cells.

8.     This is the final step, you can “Finish & Merge” your addresses into the labels.  You can do this a couple of ways;

  • You can merge them into the document so you can check it over and fix any individual ones you want.  This will open a new document with all the addresses merged and you can adjust as you want and then save it to print when you are ready.
  • You can print the documents, so you would have your labels in the printer and then you would just directly print them.

I suggest you merge into a document if this is the first time you have done this, then you know they are right and you don’t waste labels.  But if this is something you have done lots before and you know it will work then go ahead and just print.

Now you have all your mailing labels ready to go as easy as that.  It may seem like it takes a long time when you read this tutorial but it only takes me 5 minutes to get all my labels ready to print.  You can also do fun things like add a cute picture to the labels, like a Christmas one, so that they are all themed for mailing.
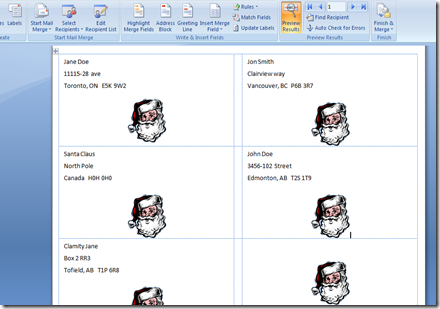
image

I hope that this helps take time away from labeling all your Christmas Cards.  To save even more time I print return labels, mailing labels, get stamps that are peel & stick and the envelopes are also peel & seal - then you can get them stuffed and ready to go in no time.

Good luck and happy labeling!